WebCall Widgets
Enabling Web Calls For Your Website Visitors
Traditional "website initiated calls" could be setup even with the older versions of Thirdlane Business Phone System or Thirdlane Multi Tenant, where a website visitors could enter their phone numbers and request a callback. PBX would initiate a call to the number that was specified, and route the call to agents via Call Center queues or any other available method.
Unfortunately, with this approach, visitors need a phone they may not have available, and a phone number which they may be reluctant to disclose. Besides, depending on the location, the costs of phone calls may be significant, especially for businesses with customers worldwide.
Abuse and fraud are also something that has to be dealt with when using traditional website initiated calls.
With the WebCall Widgets, Thirdlane provides this "web call" functionality without associated problems.
WebCall Widget is a snippet of HTML and Javascript code, which when placed on the website, allows web site visitors make calls using their web browser. No phone is required.
These "web calls" are treated the same way as any other calls entering your PBX, and therefore all the advanced functionality such as IVR/Voice Menus, Hunt Lists, and Call Center, is available to process them.
WebCall Widget Setup
WebCall Widgets use encryption and therefore require a domain and a certificate, so it is necessary to set up your domain and install a real certificate first. You can add the domain and install associated certificate in Domains and SSL section.
Once the domain is setup, follow these steps:
- Create a Special Endpoints, specifying WebCall Widget as a type. Your WebCall Widget will be associated with this Special Endpoint. Each WebCall Widget must have its own Special Endpoint.
- Create an Inbound Route or a Feature Code to serve as a destination when routing calls started by your WebCall Widget. Note that these Routes or Feature Codes will be typically going to a Queue or IVR - but the choice is yours. Also note that multiple WebCall Widgets can use the same Inbound Route or a Feature Code.
- Create your WebCall Widget.
Create/Edit WebCall Widget
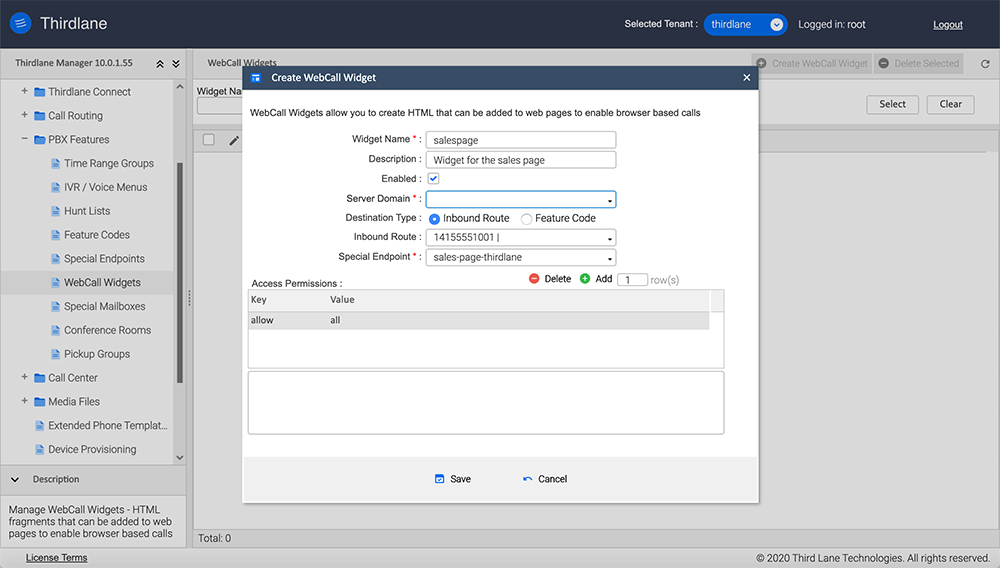
Widget Name. Choose a name for your WebCall Widget.
Enabled. Specify whether the WebCall Widget is enabled and calls from the Widget will be processed.
Server Domain. Select Server Domain from the list of domains you have created. Domain with a valid certificate is required.
Destination Type. You can associate your WebCall Widget with either an Inbound Route or a Feature Code.
Inbound Route. An Inbound Route to route this Widget's calls to.
Feature Code. Feature Code to route this Widget's calls to.
Special Endpoint. Special Endpoint this WebCall Widget is associated with.
Access Permissions. You can specify an ACL to control IP address ranges that will have access to the Widget.
Once you are finished, you can copy generated HTML to the web pages and customize and style it as needed.
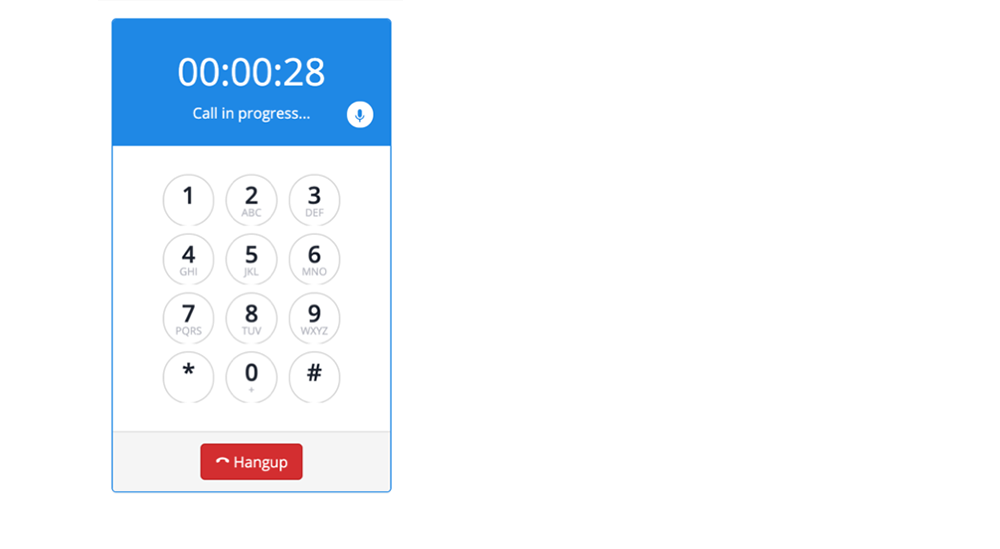
This is how the WebCall Widget looks like during a call:
This is how your WebCall Widget could look like on your page styled as button.
The "Call Us" button above is "live", click on it and the WebCall Widget behind it will call Thirdlane server so you could enjoy music-on-hold played by our phone system!