Thirdlane Connect allows you to perform basic operations with your CRM, such as importing leads, adding call notes, performing a phone number lookup, etc. Currently, the following CRMs and Service Desk apps are supported: Salesforce, Zoho, Zendesk, Freshdesk, SugarCRM, Pipedrive, X2CRM, Vtiger, with more to come. In this article, we are going to set up CRM integration in Thirdlane Connect and learn how to use CRM-related functionality.
Creating a Contact Source
Integrations with external services in Thirdlane Connect work via Contact Sources. Basically, a Contact Source is a combination of CRM type and authorization credentials. Each Thirdlane Connect user may have unlimited number of Contact Sources, which can be created and managed in the Contact Source Settings section.
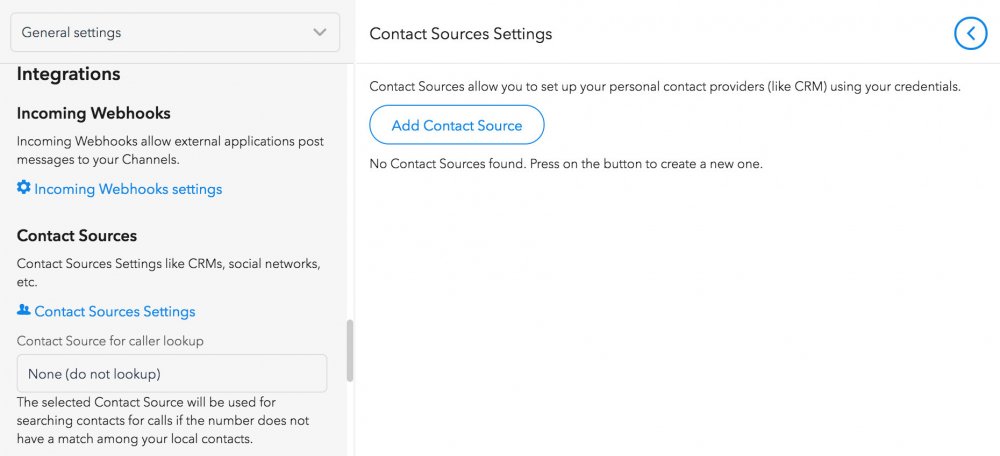
To see how this works, let’s create a new Contact Source for a Salesforce account. First, you need to open Settings tab in Thirdlane Connect, scroll to the “Integration” section (or simply select “Contact Sources” from the dropdown on top) and click on the “Contact Source Settings” link. Once you do that, the “Contact Sources Settings” page will be opened. Most likely, you did not have any contact sources, so the page will be empty. To create a new Contact Source, click on the corresponding button and fill out the following form:
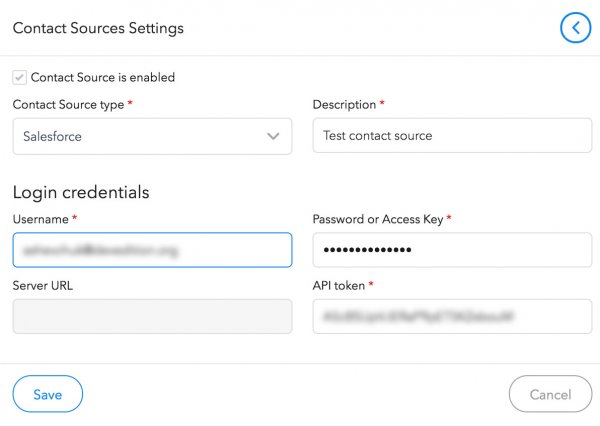
Select the contact source type (in our case, Salesforce), write a short description (this will appear on the Contact Sources Page as a quick reminder what this contact source is related to), and enter login credentials.
For Salesforce, you need to provide login, password and API token — the latter can be found in your CRM settings or profile. Other CRMs might require a full URL address — typically this is needed if a new subdomain is created for each customer (X2CRM) or if a user can install CRM on their own hosting (Vtiger). The required fields are enabled/disabled dynamically based on the Contact Source Type you choose.
Enter the login credentials for your Salesforce account and click on “Save” button. Once a new Contact Source is created, you will see it on the Contact Source Page. Here, you can disable, re-enable, edit or delete your existing Contact Sources any time.
Setting a Default Contact Source
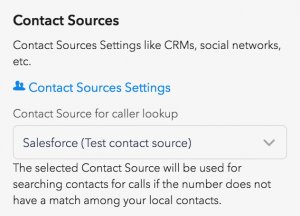
You can add as many Contact Sources, as you need, however searching in several external services at once would result in a noticeable delay. It might be inconvenient when, for instance, making a lookup by number for an incoming call. Therefore, Thirdlane Connect provides a possibility to set the main Contact Source, with which most operations will be performed. To set it, go back to Settings -> Integrations -> Contact Sources, and choose your newly created Contact Source in the dropdown under “Contact Sources Settings” button. Click “Save” button at the bottom to apply new settings. Now you are all set and ready to work with your Salesforce account.
Searching and Adding Contacts
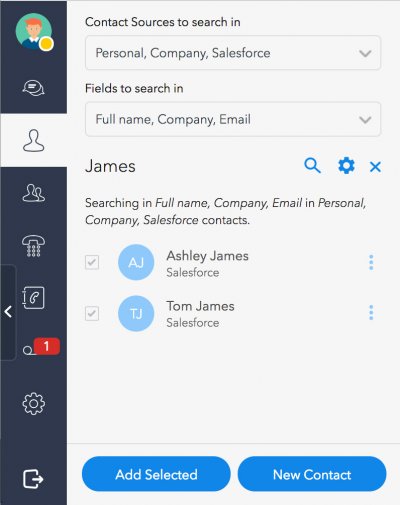
Now let us make some basic contact search in Salesforce. Open the “Contacts” tab and click on the search icon on top right. In this section, you can search both in your active (personal) and company contacts (this search works instantly) and Contact Sources. Click on the “gear” button (“Advanced search”) and add to sources your new Salesforce Contact Source. Here you can also change fields to search in. Click on the “gear” button once again to hide the settings, type a search text, and hit enter. It might take a few seconds to perform the search (depends on the number of external sources you search in), but eventually, if you provided correct authentication data and match is found, you will see the found CRM contacts in the list. Now you can also add CRM leads you are interested in to your Active Contacts and always have them “on hand”.
Call Lookups, Call Notes and New Leads
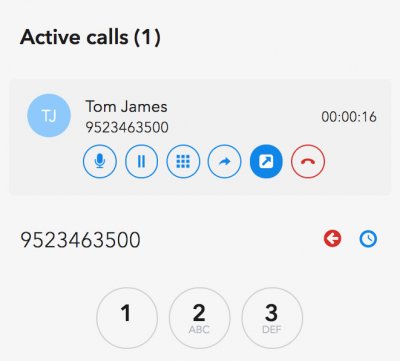
Once you have set up a default Contact Source, each call’s phone number without local matches will be sent as a query to CRM, and if the result is found, the Caller ID will be replaced with actual contact’s full name. For instance, I did not have any contact with number “9523463500” in my contact book, however since CRM lookup was performed and Salesforce returned a result for this number, I see that I am actually talking with Tom James. Later, all call history records and voicemails with this number will be titled as “Tom James” as well. Notice that there is also a button “Open in CRM” (highlighted on the screenshot) which opens this lead’s page in a new browser tab.
Additional phone lookup
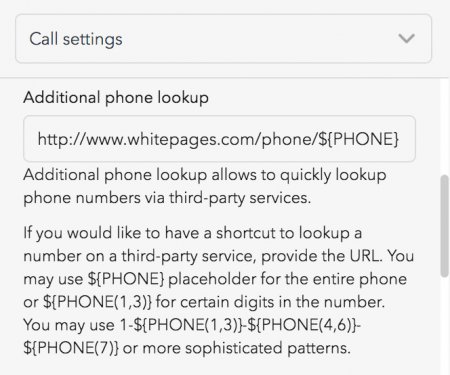
Besides CRMs, you can lookup unknown numbers instantly with web services like whitepages.com. All you need to do is to properly setup the URL, using a special syntax. Open your Settings tab and go to Call settings -> Additional phone lookup. In order to use Whitepages, enter “http://www.whitepages.com/phone/${PHONE}” in this field and press save. Fortunately, Whitepages are smart enough to strip non-numeric characters and perform search on a correctly formatted phone number. For services that require strictly formatted input, you may use a special syntax, which is briefly described in the Settings. Basically, it allows you to add prefixes, suffixes, dashes or any other characters, and use phone number characters ranges.
Now a new lookup button will be shown in controls of all calls that have no associated contacts — neither local, nor found in CRM. If you click on it, a new browser tab will be opened, and you will see the lookup results on your the phone lookup service’s website.
So that’s it, now you know how to set up and use CRM integrations in Thirdlane Connect as well as connecting phone lookup web services. If you have any questions, feel free to ask them on our forum, and we will be happy to help.
If you click on the call, an ongoing call page will be opened:
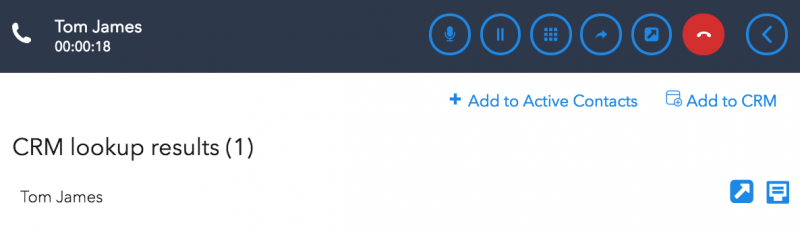
On this page, you can do the following:
- Quickly add the found lead to your active contacts
- Add a new lead to your CRM if the found CRM lead is not actually the person you are talking with
- See the full list of CRM lookup results (in case, if there is more than 1 result, the call gets associated with the first lead in the list)
- Add a call note to a lead from the list. Once you submit a simple form, a new notice will be added to your CRM, referring to the current call by its unique ID.
For calls in call history, this functionality is available on the “Call details” page. To open it, click on the “Call details” from call history record’s menu, and you will see the results of default CRM’s lookup, available actions (open lead in browser or add a new Call Note), and the extended information on the call.